There is a specific kind of silence in a woodshop just after the machines turn off, and the real work begins. It’s the stage where the raw, dusty timber starts to look like something you’d actually want in your living room. Among the clutter of chisels and hand planes, the Furniture Polishing Brush often sits quietly, looking quite unassuming. One might think it’s just a fancy duster, but anyone who has spent hours trying to get a consistent sheen on a mahogany table knows better.
The truth is, finishing wood is as much about the tools of application as it is about the oil or wax itself. A brush isn’t just a brush when it comes to high-end joinery. It’s a precision instrument designed to manipulate the surface of the wood at a microscopic level.

Defining the Furniture Polishing Brush
So, what are we actually talking about here? At its core, a Furniture Polishing Brush is a tool used to apply, distribute, and buff finishes—usually waxes or oils—into wooden surfaces. Unlike a paint brush, which is designed to lay a thick layer of liquid on top, a polishing brush is designed to work with the grain.
It’s often observed that the most beautiful furniture doesn’t look “painted”; it looks like the glow is coming from within the wood itself. Achieving that requires a tool that can reach into the tracheids and vessels of the timber, clearing out excess residue while leveling the finish.
Why Brushes Trump Cloths
While many beginners reach for an old cotton T-shirt to apply wax, there are several reasons why a dedicated brush is superior:
Heat Generation: Friction is the friend of wax. A stiff-bristled brush generates localized heat that softens the wax, allowing it to penetrate deeper into the wood fibers.
Nooks and Crannies: Have you ever tried to get wax out of a hand-carved “claw and ball” foot with a rag? It’s a nightmare. The bristles of a brush go exactly where you need them.
Uniformity: A cloth often leaves “swirl marks.” A brush, when used correctly, follows the linear path of the grain, resulting in a much more natural-looking luster.
The Industrial Cousins: Beyond the Handheld Tool
When we move away from the hobbyist’s workbench and into larger production environments, the Furniture Polishing Brush takes on different, more robust forms.
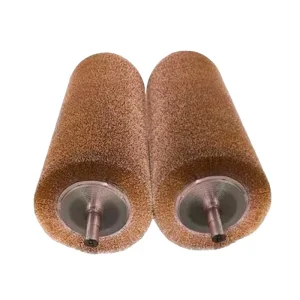
The Sisal Cylinder Brush
In factories where flooring or large-scale cabinetry is produced, you’ll frequently encounter the sisal cylinder brush. Sisal is a stiff, natural fiber derived from the agave plant. It’s incredibly tough. In a “cylinder” format, these brushes spin at high speeds to “break” the surface of hard woods, creating a slightly textured, rustic finish that is very popular in modern farmhouse aesthetics. Interestingly, sisal is often used as a precursor to finer polishing because it clears away the “fuzz” (grain raise) that happens after staining.
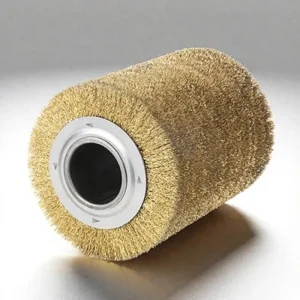
The Cylinder Polishing Brush for Specialized Shapes
For rounded items—think chair legs, spindles, or banisters—a standard flat brush is useless. This is where the cylinder polishing brush shines. These are often mounted on lathes or specialized sanding machines. The beauty of a cylindrical shape is that it provides a continuous contact point on curved surfaces, ensuring that the polish is even all the way around the radius of the wood.
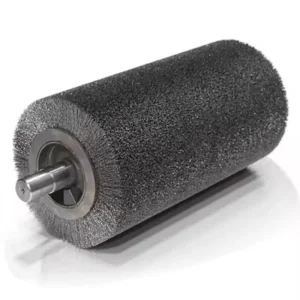
Prep Work: The Sandpaper Brush for Wood
Before you even think about the final polish, the surface has to be perfectly prepped. One might find that traditional hand-sanding is too aggressive for delicate veneers or complex mouldings. This is where a sandpaper brush for wood (sometimes called a flap brush or an abrasive brush) comes into play.
These brushes aren’t just bristles; they are a hybrid tool where abrasive strips are interspersed with supporting bristles.
Deburring: They remove the tiny splinters left behind by saws.
Contour Sanding: Unlike a hard sanding block, the brush “wraps” around the wood.
Surface Leveling: It smooths the transition between different wood densities (like the difference between heartwood and sapwood).
Using a sandpaper brush for wood is often the “missing step” that separates a DIY project from a professional-grade piece of furniture. It prepares the “canvas” so that when the Furniture Polishing Brush eventually touches the wood, the result is flawless.
Material Comparison: Choosing Your Bristles
Not all bristles are created equal. The material you choose dictates the final “mood” of the wood. A stiff synthetic might be great for a rugged outdoor bench, but it would ruin a French-polished antique.
How to Properly Use a Furniture Polishing Brush
It seems simple—just scrub, right? Well, not exactly. There is a technique that one generally picks up after a few ruined finishes.
Step 1: The Loading Phase
Don’t glob the wax onto the brush. Instead, apply a thin layer of wax to the wood with a cloth, then use the brush to spread it. Or, lightly “dab” the tips of the brush into the wax. You want the tips to do the work, not the base of the bristles.
Step 2: The Linear Stroke
Always start by following the grain. If you’re working on a large table, walk the length of it. It’s often said that long, confident strokes produce a better finish than short, choppy ones.
Step 3: The Cross-Grain Buff (Optional)
On very open-pored woods like Oak, some craftsmen like to brush across the grain briefly to ensure the pores are filled, followed immediately by a long stroke with the grain to tidy everything up.
Step 4: The Final “Light” Touch
As the wax begins to harden (you’ll feel the brush start to “drag”), lighten your pressure. This final stage is what creates the “mirror” effect.
Maintenance: Keeping Your Brush in Top Shape
If you treat a Furniture Polishing Brush well, it will likely outlive you. But if you let wax dry and harden in the bristles, it becomes a very expensive paperweight.
Comb It Out: Every few uses, use a metal comb to pull out dried wax and wood dust from the bristles.
The Solvent Dip: If the brush gets truly “gunked up,” a quick dip in mineral spirits can break down the wax. Just make sure to let it dry completely before using it again.
Storage Matters: Never store a brush on its bristles. It will deform the shape. Hang it up or store it bristle-side up.
Final Thoughts: The Soul of the Wood
In an age of plastic-coated furniture and “disposable” home goods, taking the time to use a Furniture Polishing Brush feels almost like a radical act. It’s a commitment to quality. Whether you are using a sisal cylinder brush to create a rugged texture or a cylinder polishing brush to finish a delicate chair leg, you are participating in a tradition that spans centuries.
The brush is the final bridge between the tree and the home. It’s the tool that says, “This is finished. This is ready to be used and loved.” And that, perhaps, is the most important part of the whole process.